Hooks are event-driven triggers that intercept Claude Code at specific points — before it writes a file, after it runs a command, when it needs your input. They let you control Claude's actions, not just react to them.
Yet most engineers skip right past them. Once you start using hooks, you'll wonder how you ever worked without them.
Imagine Claude Code that auto-formats every file it touches. Runs tests after every edit. Pings you on Slack the moment it needs input. Blocks dangerous commands before they execute. Creates git checkpoints before risky operations. Remembers context across sessions. Enforces TDD by refusing to write code until tests exist. That's not a wish list — that's what hooks let you build.
The docs exist, but practical examples are scarce. This post is the guide I wish existed when I started — from understanding the event system to building hooks that actually matter.
I've open-sourced a growing collection of hooks at claude-code-hooks. Tested hooks plus a roadmap of ideas to supercharge your Claude Code workflow.
See It In Action
Here's what hooks look like in practice — blocking dangerous operations before they can execute:


What Are Hooks, Really?
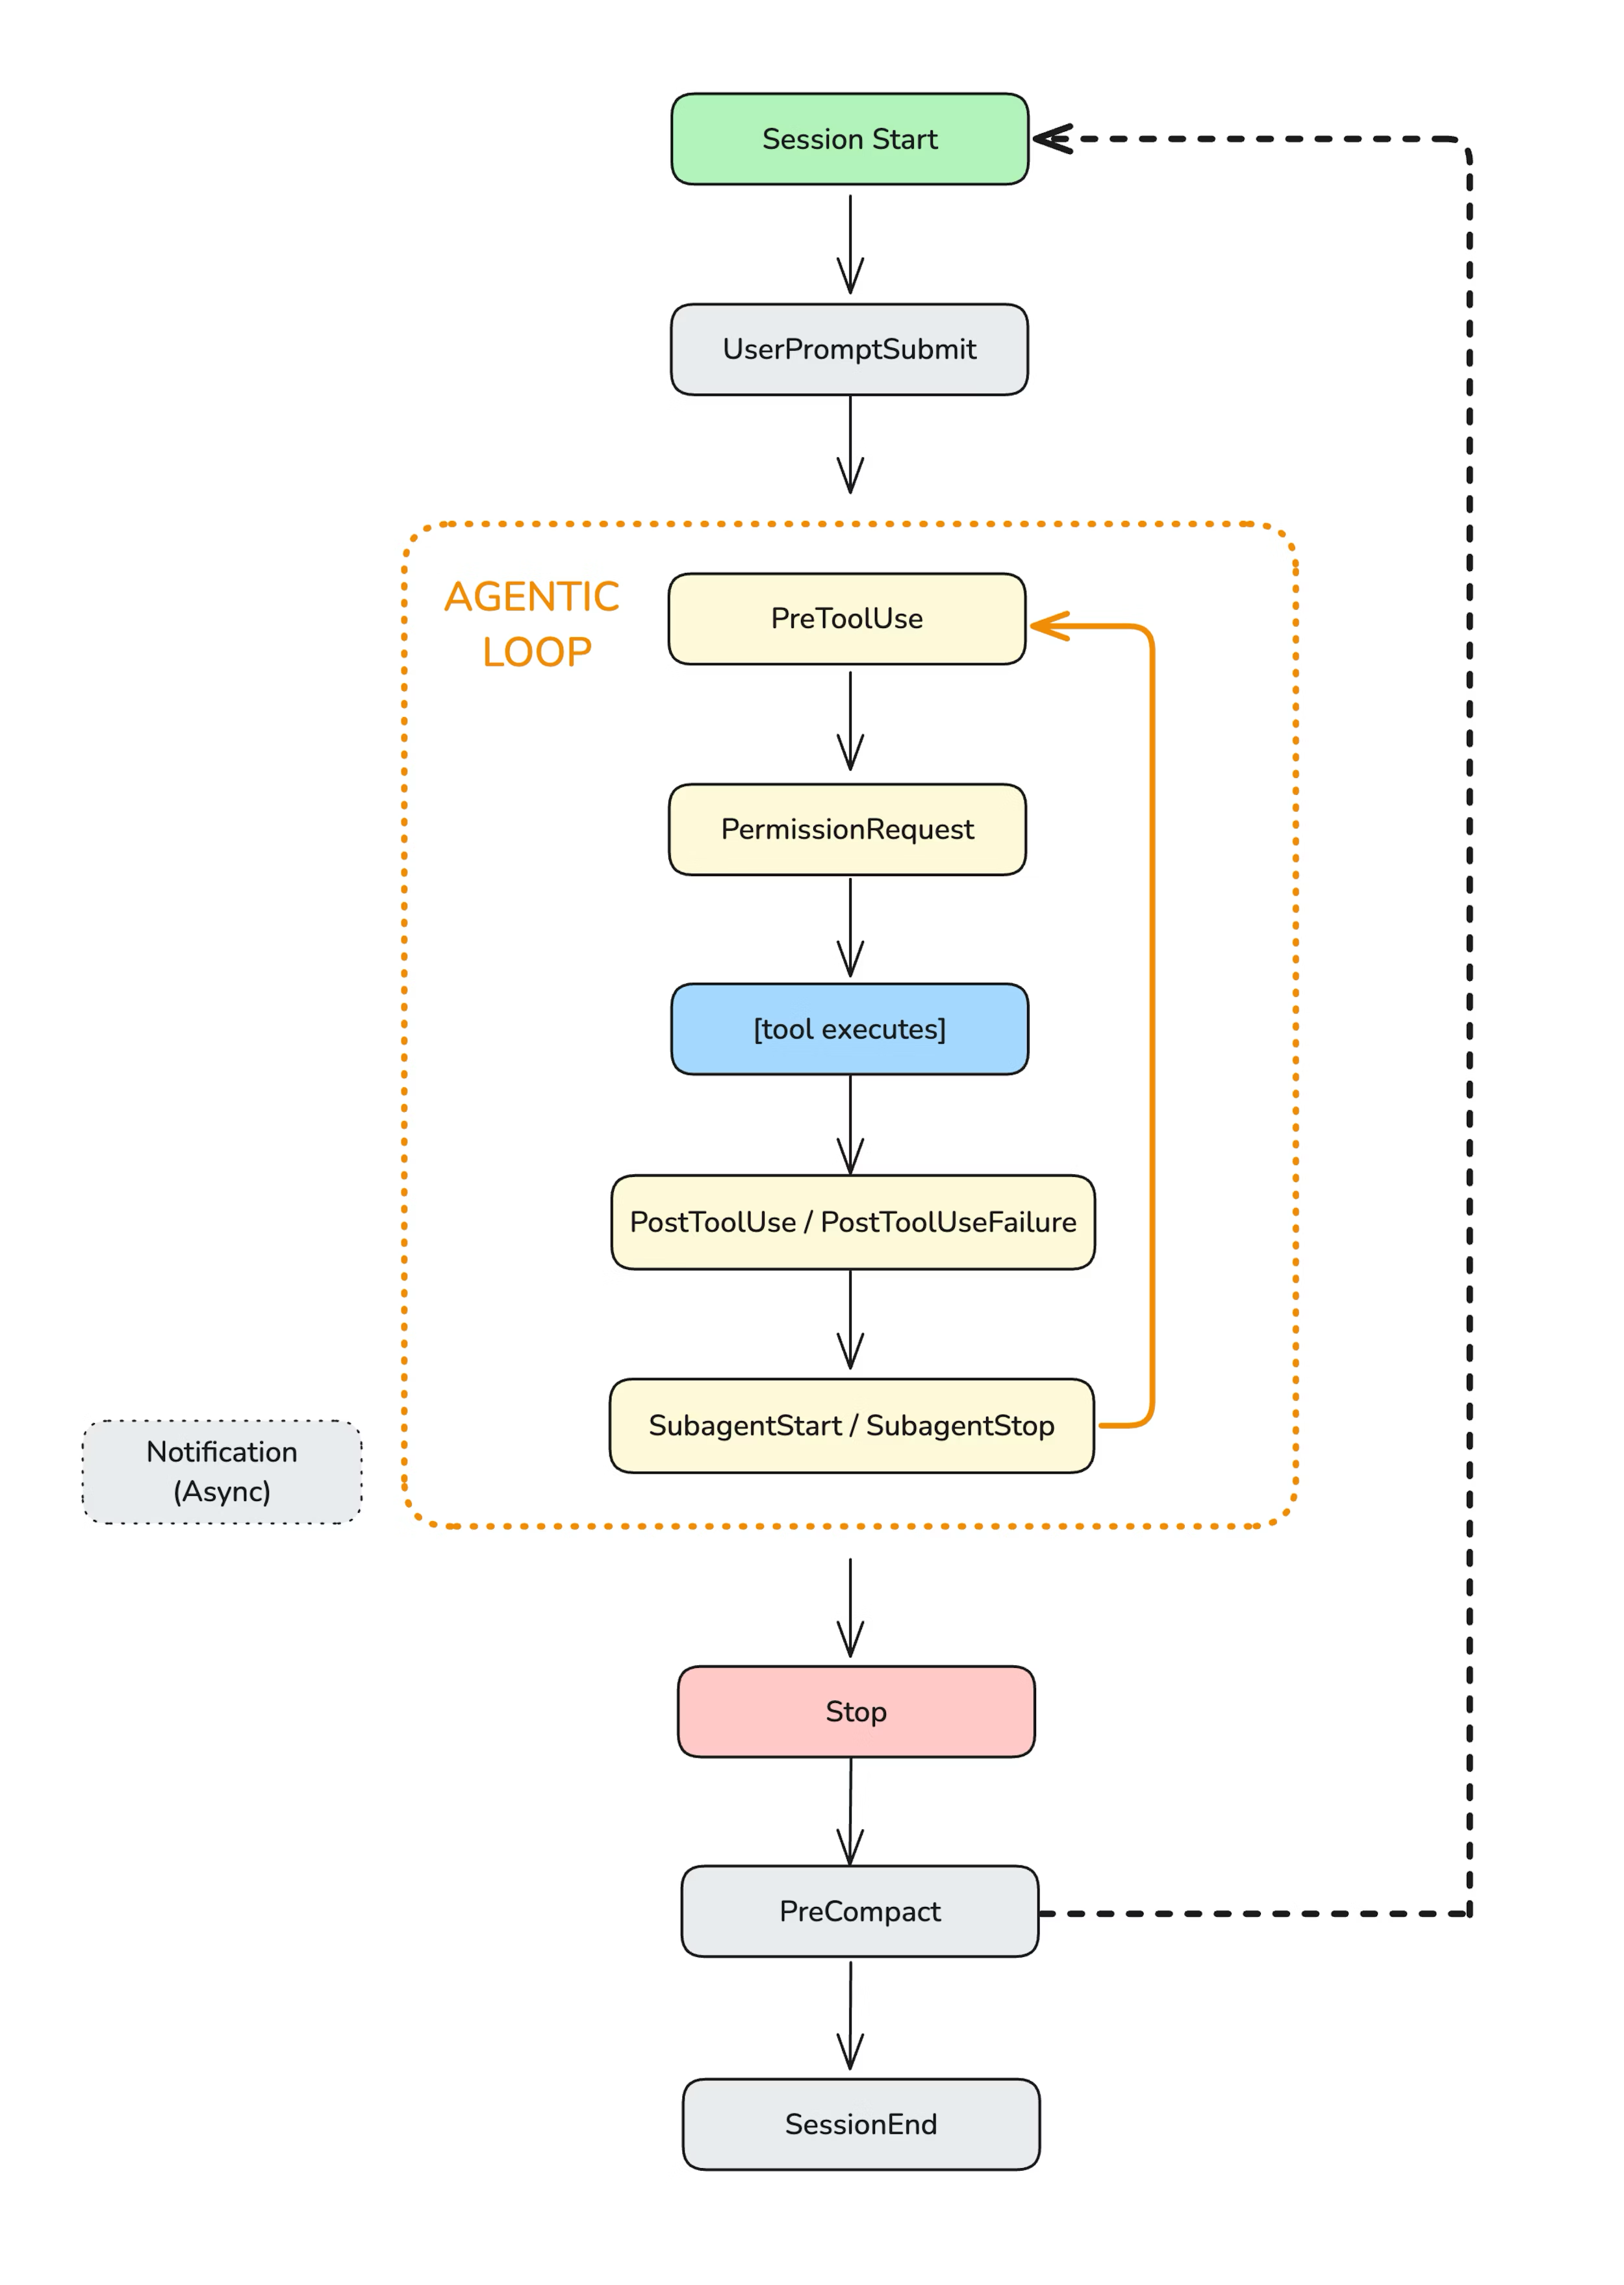
Think of Claude Code as a loop: it thinks, it acts (reads files, writes code, runs commands), and it repeats. Hooks intercept that loop at specific points — before, during, or after each action.
Your hook receives JSON via stdin (session info, tool name, inputs), does whatever logic you want, and returns a decision. Block the action. Allow it. Modify it. Add context. Send a notification. It's your code, your rules.
There are 13 hook events, way more than most people realize:
- SessionStart — session begins or resumes (e.g., load context, set env vars)
- SessionEnd — session terminates (e.g., cleanup, save state)
- UserPromptSubmit — user submits a prompt (e.g., validate input, add context)
- PreToolUse — before tool execution (e.g., block dangerous commands, auto-approve)
- PostToolUse — after tool succeeds (e.g., auto-stage files, run formatters)
- PostToolUseFailure — after tool fails (e.g., handle errors, cleanup)
- PermissionRequest — permission dialog appears (e.g., auto-allow/deny)
- SubagentStart — spawning a subagent (e.g., track launches, enforce limits)
- SubagentStop — subagent finishes (e.g., evaluate completion, merge results)
- Stop — Claude Code finishes responding (e.g., decide if it should continue)
- PreCompact — before context compaction (e.g., preserve critical info)
- Setup — with
--init,--init-only, or--maintenance(e.g., one-time setup) - Notification — Claude Code sends notifications (e.g., custom alerts to Slack)
Here's how they fit into the lifecycle (from the official docs):
Each hook receives context via stdin as JSON: session ID, tool name, inputs, outputs. You can write hooks in any language.
The challenge? Understanding what data is actually available for each event type takes some digging. So let's make it easier.
Step 1: See What's Happening (The Event Logger)
Before you can build useful hooks, you need to understand what data Claude Code sends for each event. The best way to learn is to log everything.
I built an event-logger for exactly this. It captures every hook event to a daily log file with timestamps, event types, and full payloads. Add it to your .claude/settings.json:
{
  "hooks": {
    "PreToolUse": [{
      "matcher": "*",
      "hooks": [{ "type": "command", "command": "python ~/.claude/hooks/event-logger.py" }]
    }],
    "PostToolUse": [{
      "matcher": "*",
      "hooks": [{ "type": "command", "command": "python ~/.claude/hooks/event-logger.py" }]
    }]
  }
}
This example shows two events, but you can add the logger to any of the 13 events to see their payloads.
Now use Claude Code normally. Then view your logs:
# View today's logs
cat ~/.claude/hooks-logs/$(date +%Y-%m-%d).jsonl | jq

# Filter by event type
cat ~/.claude/hooks-logs/*.jsonl | jq 'select(.hook_event_name=="PreToolUse")'
You'll see exactly what data flows through each event: tool names, file paths, command inputs, everything. This is how you learn what's possible.
Step 2: Python vs Node for Hooks
You can write hooks in any language, but there's an important consideration: startup time.
Hooks run synchronously. Claude Code waits for them to finish before continuing. If your hook takes 500ms to start, every tool call gets 500ms slower. This adds up fast — PreToolUse fires on every single tool call, which can be dozens per session.
Here's the reality:
- Node.js: Fast startup (~50-100ms). Best for frequent events like PreToolUse, PostToolUse.
- Python: Slower startup (~200-400ms). Fine for infrequent events like SessionStart, or for debugging.
- Bash: Fastest startup (~10-20ms). Perfect for simple operations.
My recommendation: use Node.js for high-frequency hooks (anything on PreToolUse or PostToolUse). Use Python for exploration, debugging, or hooks that only fire once per session.
The production hooks in my repo are written in Node.js for this reason. The event-logger is in Python since it's only for debugging and runs infrequently.
Step 3: Start Here (High-Value Hooks)
These are the hooks I recommend starting with — immediate value, minimal setup. They're tested and documented in my hooks repo. Once you see how they work, you'll have ideas for dozens more.
1. Block Dangerous Commands
This is the hook I run on every project. It blocks catastrophic bash commands before Claude Code can execute them:
rm -rf ~orrm -rf /- Fork bombs
curl | sh(piping URLs to shell)- Force push to main/master
git reset --hardchmod 777
The hook has three safety levels you can configure:
- critical: Only catastrophic (rm -rf ~, fork bombs)
- high: + risky (force push main, secrets exposure). Recommended.
- strict: + cautionary (any force push, sudo rm)
{
  "hooks": {
    "PreToolUse": [{
      "matcher": "Bash",
      "hooks": [{
        "type": "command",
        "command": "node ~/.claude/hooks/block-dangerous-commands.js"
      }]
    }]
  }
}
When a dangerous command is blocked, Claude Code sees the reason and adjusts. It's a safety net that costs almost nothing.
2. Protect Secrets
This hook prevents Claude Code from reading, modifying, or exfiltrating sensitive files:
.envfiles- SSH keys (
~/.ssh/id_*) - AWS credentials (
~/.aws/credentials) - Kubernetes configs (
~/.kube/config) - Any file matching common secrets patterns
It also blocks bash commands that would expose secrets:
cat .envecho $API_KEYcurl -d @.env(exfiltration)printenv(environment dump)
{
  "hooks": {
    "PreToolUse": [{
      "matcher": "Read|Edit|Write|Bash",
      "hooks": [{
        "type": "command",
        "command": "node ~/.claude/hooks/protect-secrets.js"
      }]
    }]
  }
}
3. Auto-Stage Changes
Every time Claude Code edits or creates a file, this hook automatically runs git add on it:
{
  "hooks": {
    "PostToolUse": [{
      "matcher": "Edit|Write",
      "hooks": [{
        "type": "command",
        "command": "node ~/.claude/hooks/auto-stage.js"
      }]
    }]
  }
}
Benefits:
git statusshows exactly what Claude Code modified- Easy to review changes before committing
- No manual staging needed
It relies on your .gitignore to exclude sensitive files, so make sure that's set up correctly.
4. Slack Notifications
When Claude Code needs input (permission prompts, idle prompts), get a Slack notification so you don't leave it hanging:
{
  "hooks": {
    "Notification": [{
      "matcher": "permission_prompt|idle_prompt",
      "hooks": [{
        "type": "command",
        "command": "node ~/.claude/hooks/notify-permission.js"
      }]
    }]
  }
}
Understanding the Data Flow
Hooks receive data two ways:
Shell Environment Variables
CLAUDE_PROJECT_DIR: Absolute path to project rootCLAUDE_CODE_REMOTE: "true" if running on web
Stdin JSON Payload
The real data comes via stdin. For PreToolUse:
{
  "session_id": "abc123",
  "cwd": "/path/to/project",
  "hook_event_name": "PreToolUse",
  "tool_name": "Bash",
  "tool_input": {
    "command": "rm -rf ~/Documents"
  },
  "tool_use_id": "xyz789"
}
Your hook reads this, decides what to do, and outputs JSON to control Claude Code's behavior:
{
  "hookSpecificOutput": {
    "hookEventName": "PreToolUse",
    "permissionDecision": "deny",
    "permissionDecisionReason": "🚨 [rm-home] rm targeting home directory"
  }
}
The permissionDecision can be "allow" (bypass permission, execute), "deny" (block, show reason to Claude), or "ask" (show permission dialog to user).
What Else Can You Build?
The hooks I've shared are just the starting point. Here's what's possible with 13 hook events:
- TDD Guard: Block implementation code unless tests exist and are failing first. Enforce red-green-refactor.
- Branch Protection: Prevent code changes on main/master. Force feature branch workflow.
- Context Preservation: Save critical decisions and state before compaction hits. Resume where you left off.
- Auto-Checkpoint: Create git commits before risky operations. One-command rollback.
- Session Memory: Persist learnings across sessions. Claude Code remembers what worked last time.
- Cost Tracking: Monitor token usage in real-time. Alert at 80% of daily budget. Pause when exceeded.
- Quality Gates: Run tests and linting after every edit. Block completion until green.
- Rules Injection: Prepend CLAUDE.md rules to every prompt. Combat rule forgetting.
- JIRA/Linear Integration: Auto-update tickets when related files change. Close on PR merge.
- Multi-Agent Orchestration: Track subagent spawns, enforce time limits, merge results.
The README in my repo has 12 more ideas. The potential is limited only by what you can script.
Tips from the Trenches
- Keep hooks fast. Anything over 100ms adds noticeable latency. Use Node.js.
- Log everything at first. Use the event logger to understand what data is available.
- Start with safety hooks. block-dangerous-commands + protect-secrets cost almost nothing and prevent disasters.
- Test your matchers. Matchers are case-sensitive. Simple strings match exactly; regex patterns like
Edit|Writealso work. - Know your config files.
~/.claude/settings.jsonfor global hooks,.claude/settings.jsonfor project,.claude/settings.local.jsonfor local overrides (gitignored). - Exit codes matter. Exit 0 = success (JSON parsed, stdout shown in verbose mode via
Ctrl+O). Exit 2 = blocking error (stderr sent to Claude, JSON ignored). Other codes = non-blocking warnings.
Get the Hooks
Everything I've described is open-source and ready to use:
The repo includes ready-to-use hooks for safety, automation, and notifications. Plus a roadmap of ideas: auto-format, branch guards, cost tracking, Discord/ntfy notifications, session summaries, context injection, rate limiting, and more.
Star it, fork it, and contribute your own hooks. This is just the beginning.
Hooks are one of those features that seem minor but compound over time. Every blocked dangerous command saves a potential disaster. Every protected secret prevents a leak. Every auto-staged file saves a manual step.
Start with the event logger. See what's possible. Then add the safety hooks. They're the highest-value, lowest-effort wins. You'll wonder why you waited.
There's more to cover — prompt-based hooks, context injection, session memory, and advanced patterns. I'll dig into those in future posts.
Want to know when I publish the next one?
Grab the RSS feed